|
|
Many of you like the Color Profiles for Lightroom that I have developed for some devices from various brands. For now : Canon, Nikon, Sony, Fuji, Panasonic, Leica, Apple, Autres… Installation Guide in English is Here.
And in addition some (less numerous however), adopted my Adaptive ISO Presets; that I consider really essential in order to achieve a smooth Workflow… Install Guide in English is Here. You’ve probably learned to apply either one or the other automatically …
But most photographers are unaware that they can automate the application of Profiles and ISO Adapt Presets: together and at the same time … This as soon as the images are imported!
Yes, instantly applying both automatically is possible … and it is even vital.
| PROFILES FOR : CANON ⎪ NIKON ⎪ SONY ⎪ FUJIFILM ⎪ LEICA ⎪ PANASONIC ⎪ APPLE ⎪ DJI ⎪ OM SYSTEM ⎪RICOH ⎪ NEGATIVE FILM ⎪ ISO ADAPTATIF PRESET ⎪ Ai PRESET |
Why apply an Adaptive ISO Presets automatically, along with a Color Profile … automatically ? The goal of the game is of course to save time… twice! First, by no longer worrying about “Color profiles” issues, device by device; because you will have personalized which Color Profile will be applied automatically, for the RAW of such or such device.
Second: save time again! Since there will be no need to worry about the Settings of the 10 Sharpness and Noise Correction sliders … These will automatically be set by one of my Adaptive ISO Presets, depending on the ISO Sensitivity of each image …
This double automation works superbly! I will try to show you quickly in this article, how to set it up. You have to proceed in three simple steps… here is it. And I remain at your disposal in comments, to answer questions…
1 / CREATION OF A BASIC “DEVELOP PRESET” FOR YOUR SPECIFIC DEVICE
This first part concerns the customization of the Color Profile, which will be automatically applied for the RAWs of a given device. It’s very easy, as long as you follow the explanations. It will be done in 5 or 10 minutes.
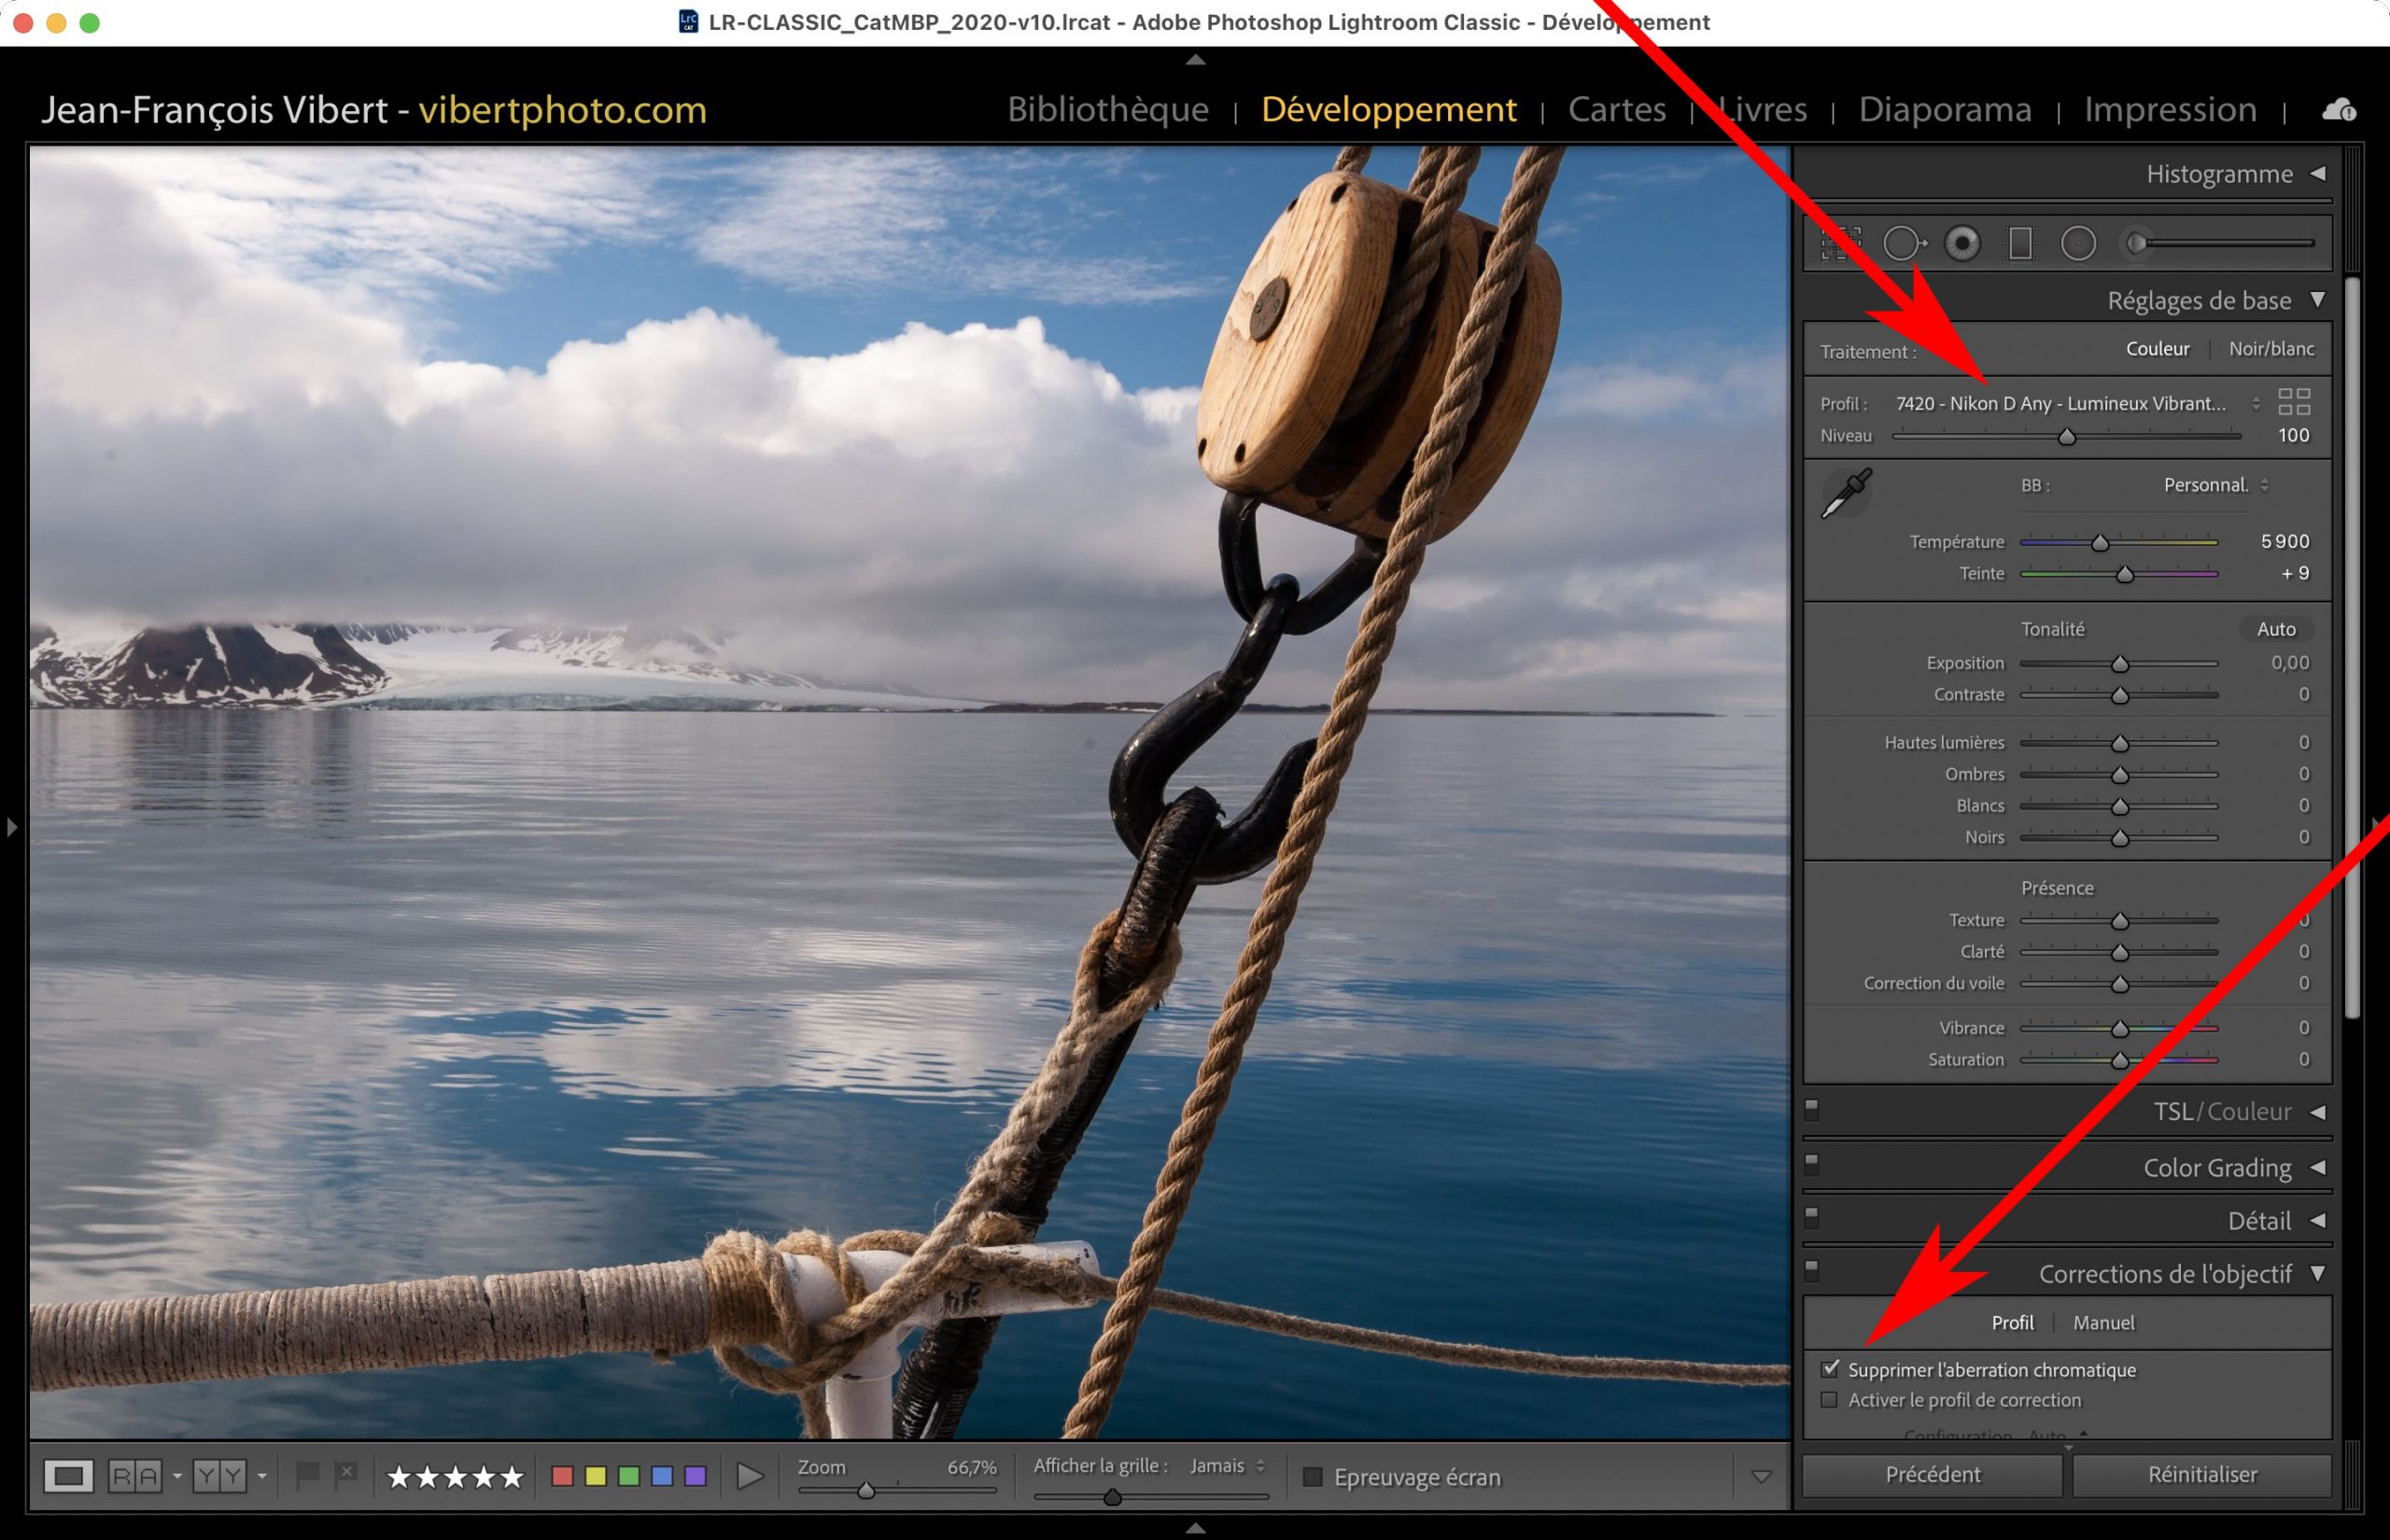
A – Choose a RAW of the specific device whose Default Development you want to customize
– Important: Start with Reset this RAW file: it should not have any adjustments.
– Apply the desired Color Profile: the one you have already installed (Installation Guide in English is Here).
– Optional: you can optionally check the “Chromatic aberration correction” tool (recommended).
– Optional (dangerous): possible to add “Lens Correction Profile”. But imperatively in “Auto” position, otherwise big worries!
– Optional: optionally add other adjustments if you wish (but be careful not to do anything).
– So here you are faced with a RAW having “the basic characteristics” only in the future: you will want to apply automatically to this specific device.
B – Create a specific “Develop Preset” for this specific device
– In the left panel of the Development Module, create a “Develop Preset” by checking only the tools that you included in step A. This is generally limited to “Processing and Profiles”, possibly “Correction of Chromatic Aberrations” …
– I advise you to clearly name your “Develop Preset”… For example “Develop Base – Canon EOS R5” replace “Canon EOS R5” by the model of your device.
– It is also advisable to create a “Folder” of Settings, in which to store it… This Folder will also host the next “Basic Settings” that you will customize for each device: old or future.
– In order not to confuse Folders and Settings and identify it more quickly in the list: name this folder using capital letters. For example: “RAW DEVELOP PRESET BASES BY MODELS“
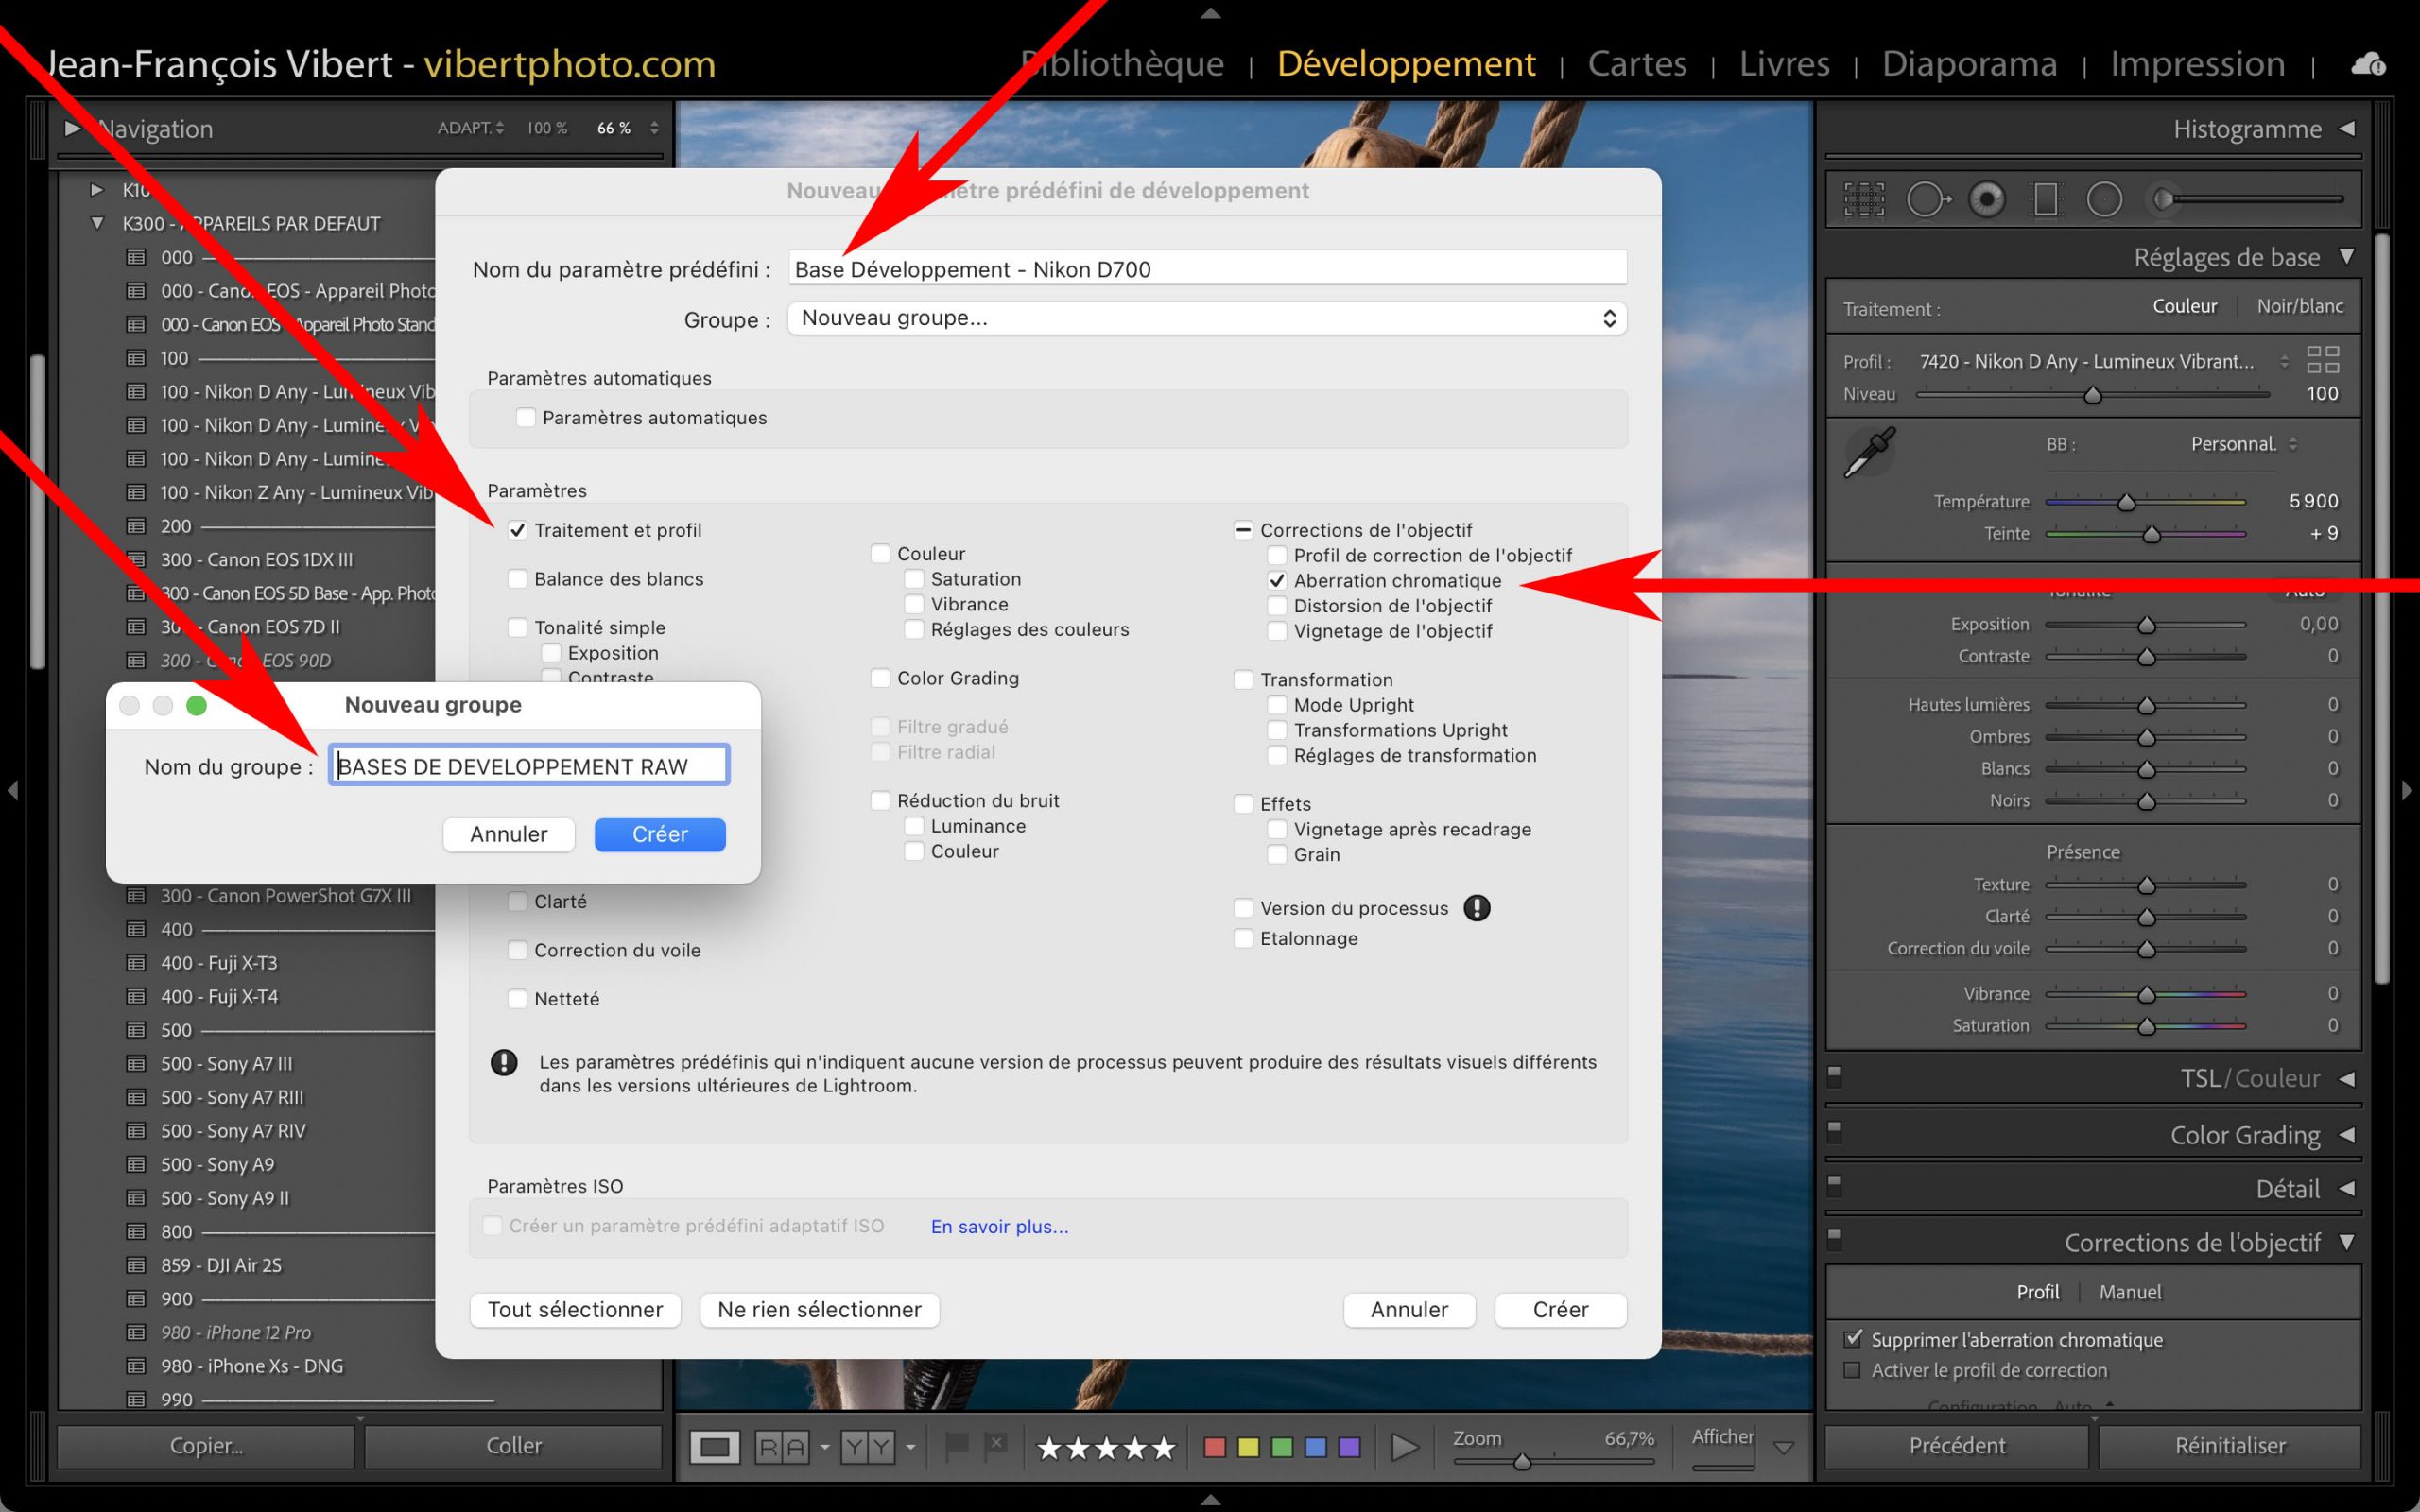
– If this part is not clear enough, go to Adobe’s User Guide: Work with Develop Presets.
2 / IN THE “LIGHTROOM CLASSIC PREFERENCES” : SETTING OF THE “DEFAULT DEVELOP PRESET”
We then go to the General Preferences of Lightroom Classic, which allow to define which will be the “Default development” applied by the software: for each type of RAW files. Note that JPEGs and other types of files are not affected by this step.
We will generally start by carrying out a “general” adjustment which will concern all the RAWs in an undifferentiated way (this will be step C below). We can consider this first setting as the “General rule” for all RAW files.
Then if you want more customization: you can replace this Global Develop Preset, with a Specific Develop Preset for each device of your choice (not necessarily all devices, but some) … This will be step D below, which is optional. This step amounts to constituting a list of “exceptions to the general rule”, which is very interesting if you have RAWs of various brands of devices:
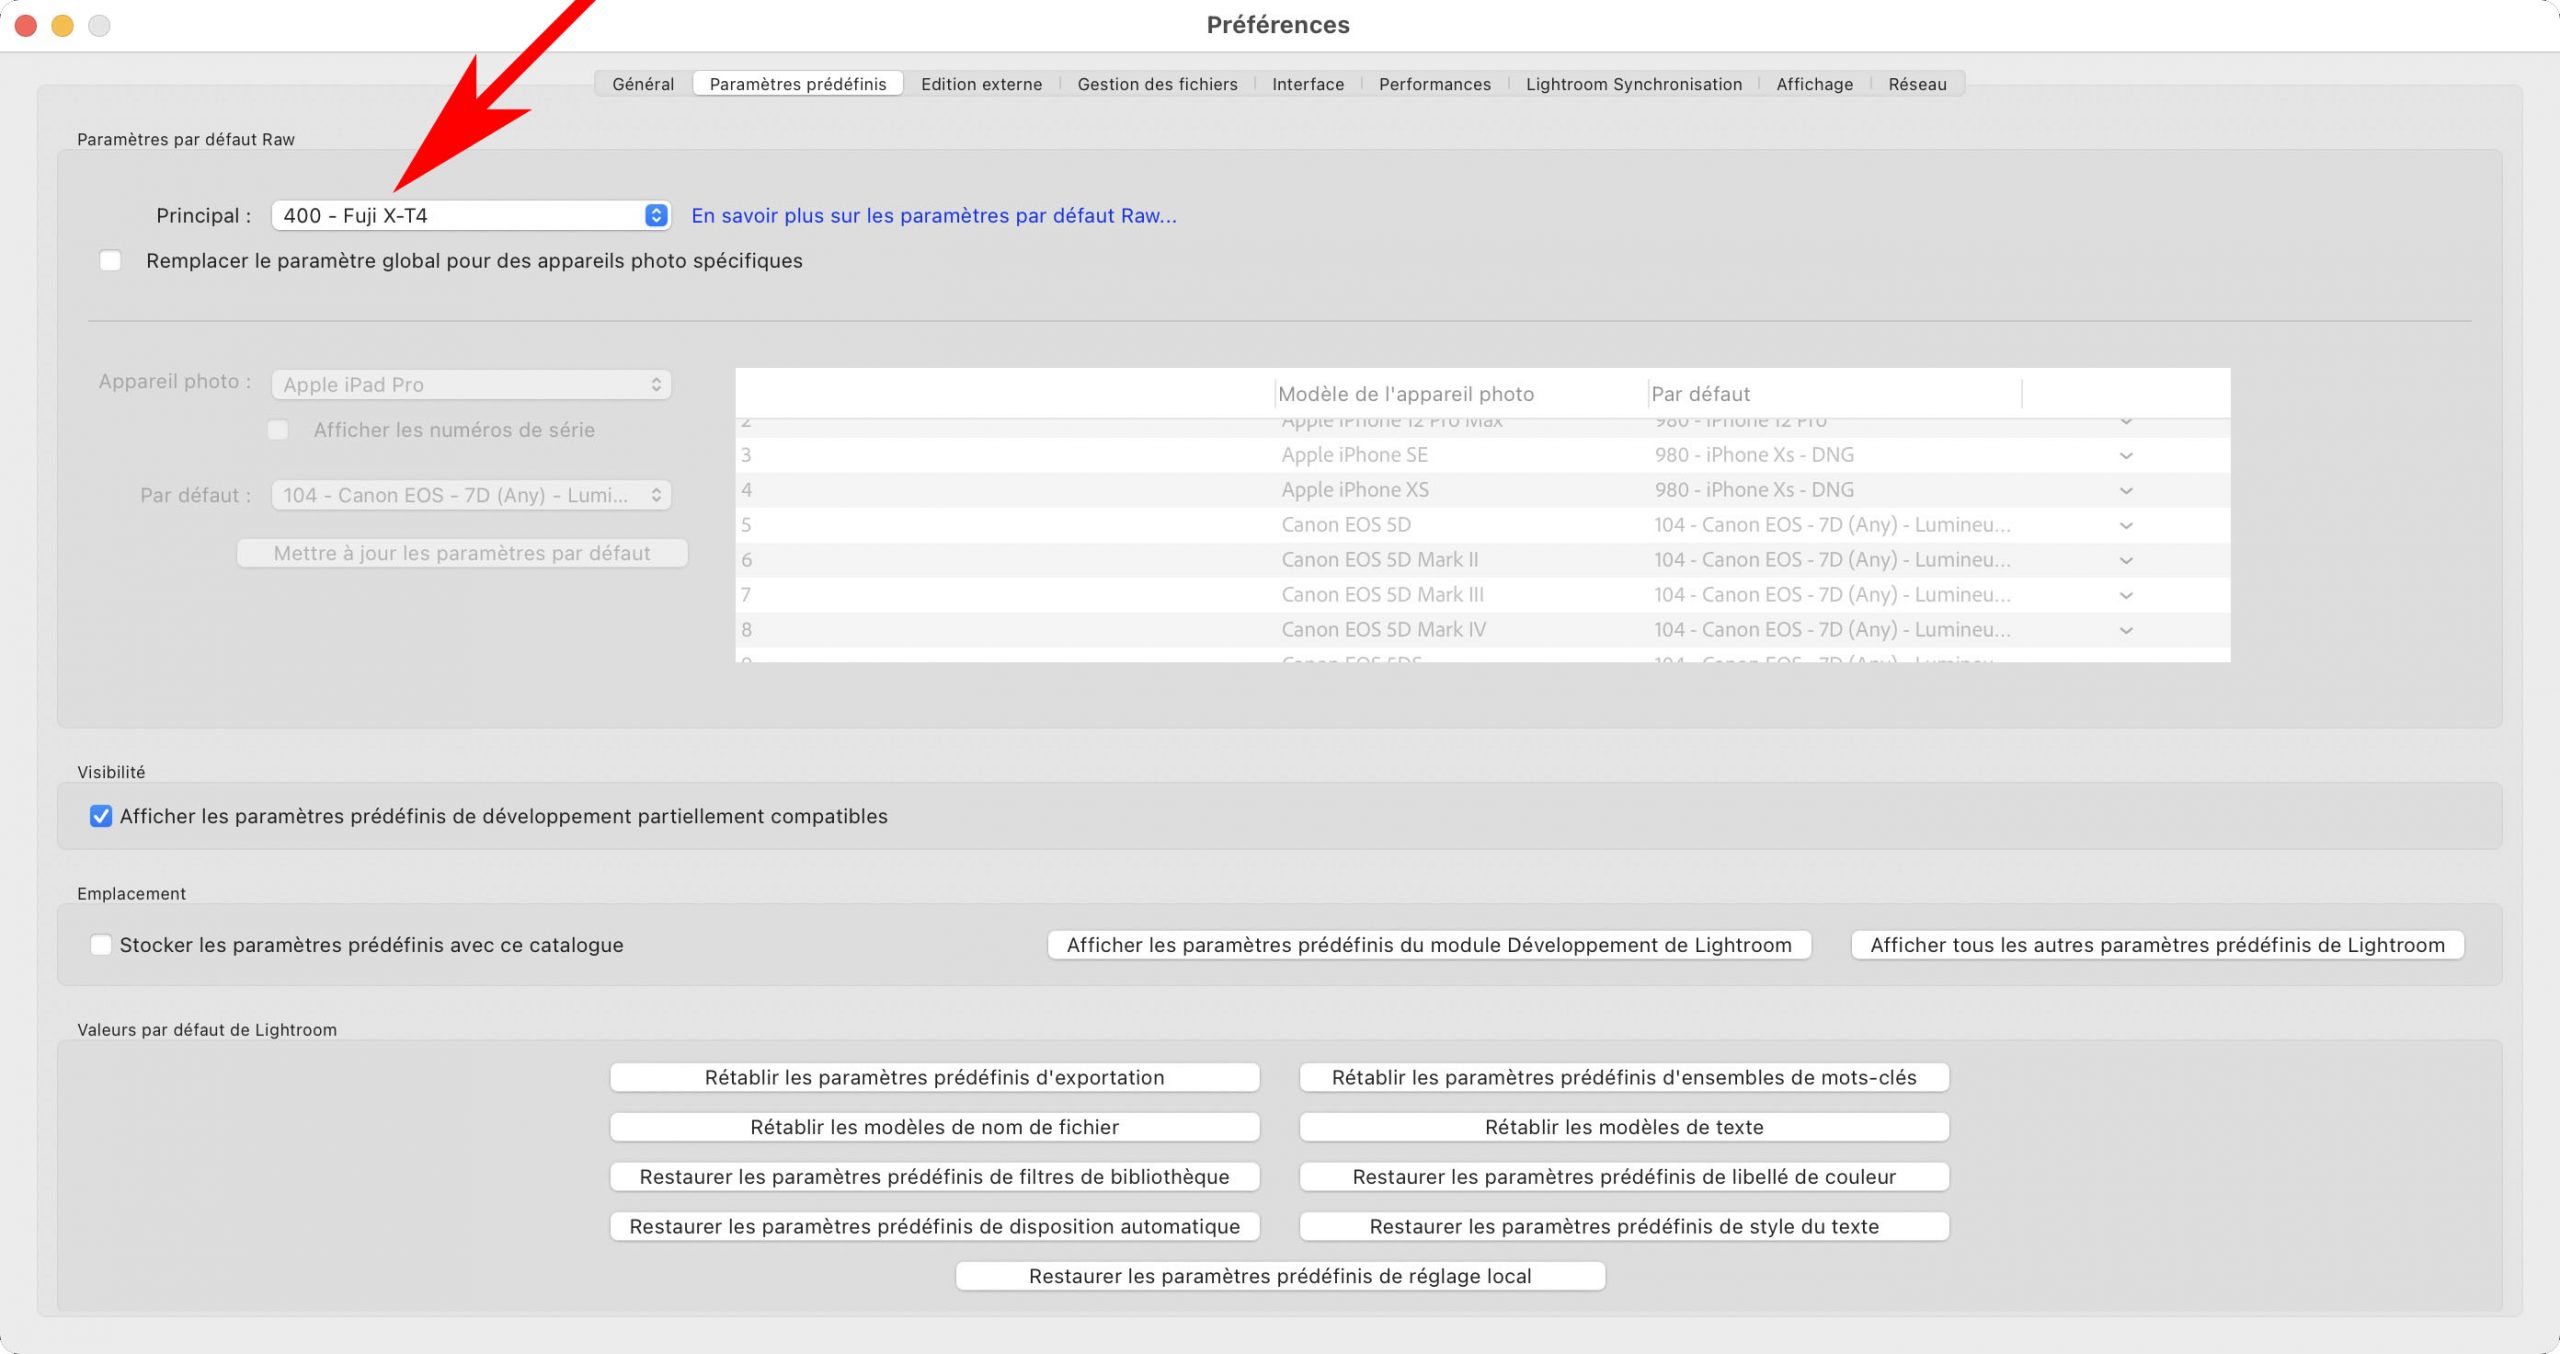
C – First: setting an identical “Default Develop Preset” for all RAWs
– Open Lightroom preferences, go to the Predefined Settings Tab
– Explore the “Predefined Develop Preset” tree structure and select one of the “Develop Preset” that you created in step B: red arrow
– If you are lost, prefer “Adobe Default” is easiest, or possibly “Camera Settings”.
– If you don’t understand, read Adobe’s User Guide : Lightroom Classic: Set defaults for raw file import.
D – Then: setting differentiated Default Presets for each specific camera
– Open Lightroom preferences, go to the Predefined Settings Tab
– If you understood its usefulness: check the option “Replace the Global Develop Preset for specific cameras”.
– In the Drop-down menu to the right of the “Cameras” line: select the model to customize: red arrow.
– Warning ! Sometimes loading this list of devices can be slow because Lightroom crawls all the catalog. Hold on.
– In the drop-down menu to the right of the “Default” line: explore the “Develop Preset” tree structure
– Then select one of the “Develop Preset” that you had previously created in step B.
– You understand: you are going to create “Exceptions to the rule” that you memorize by clicking “Update”.
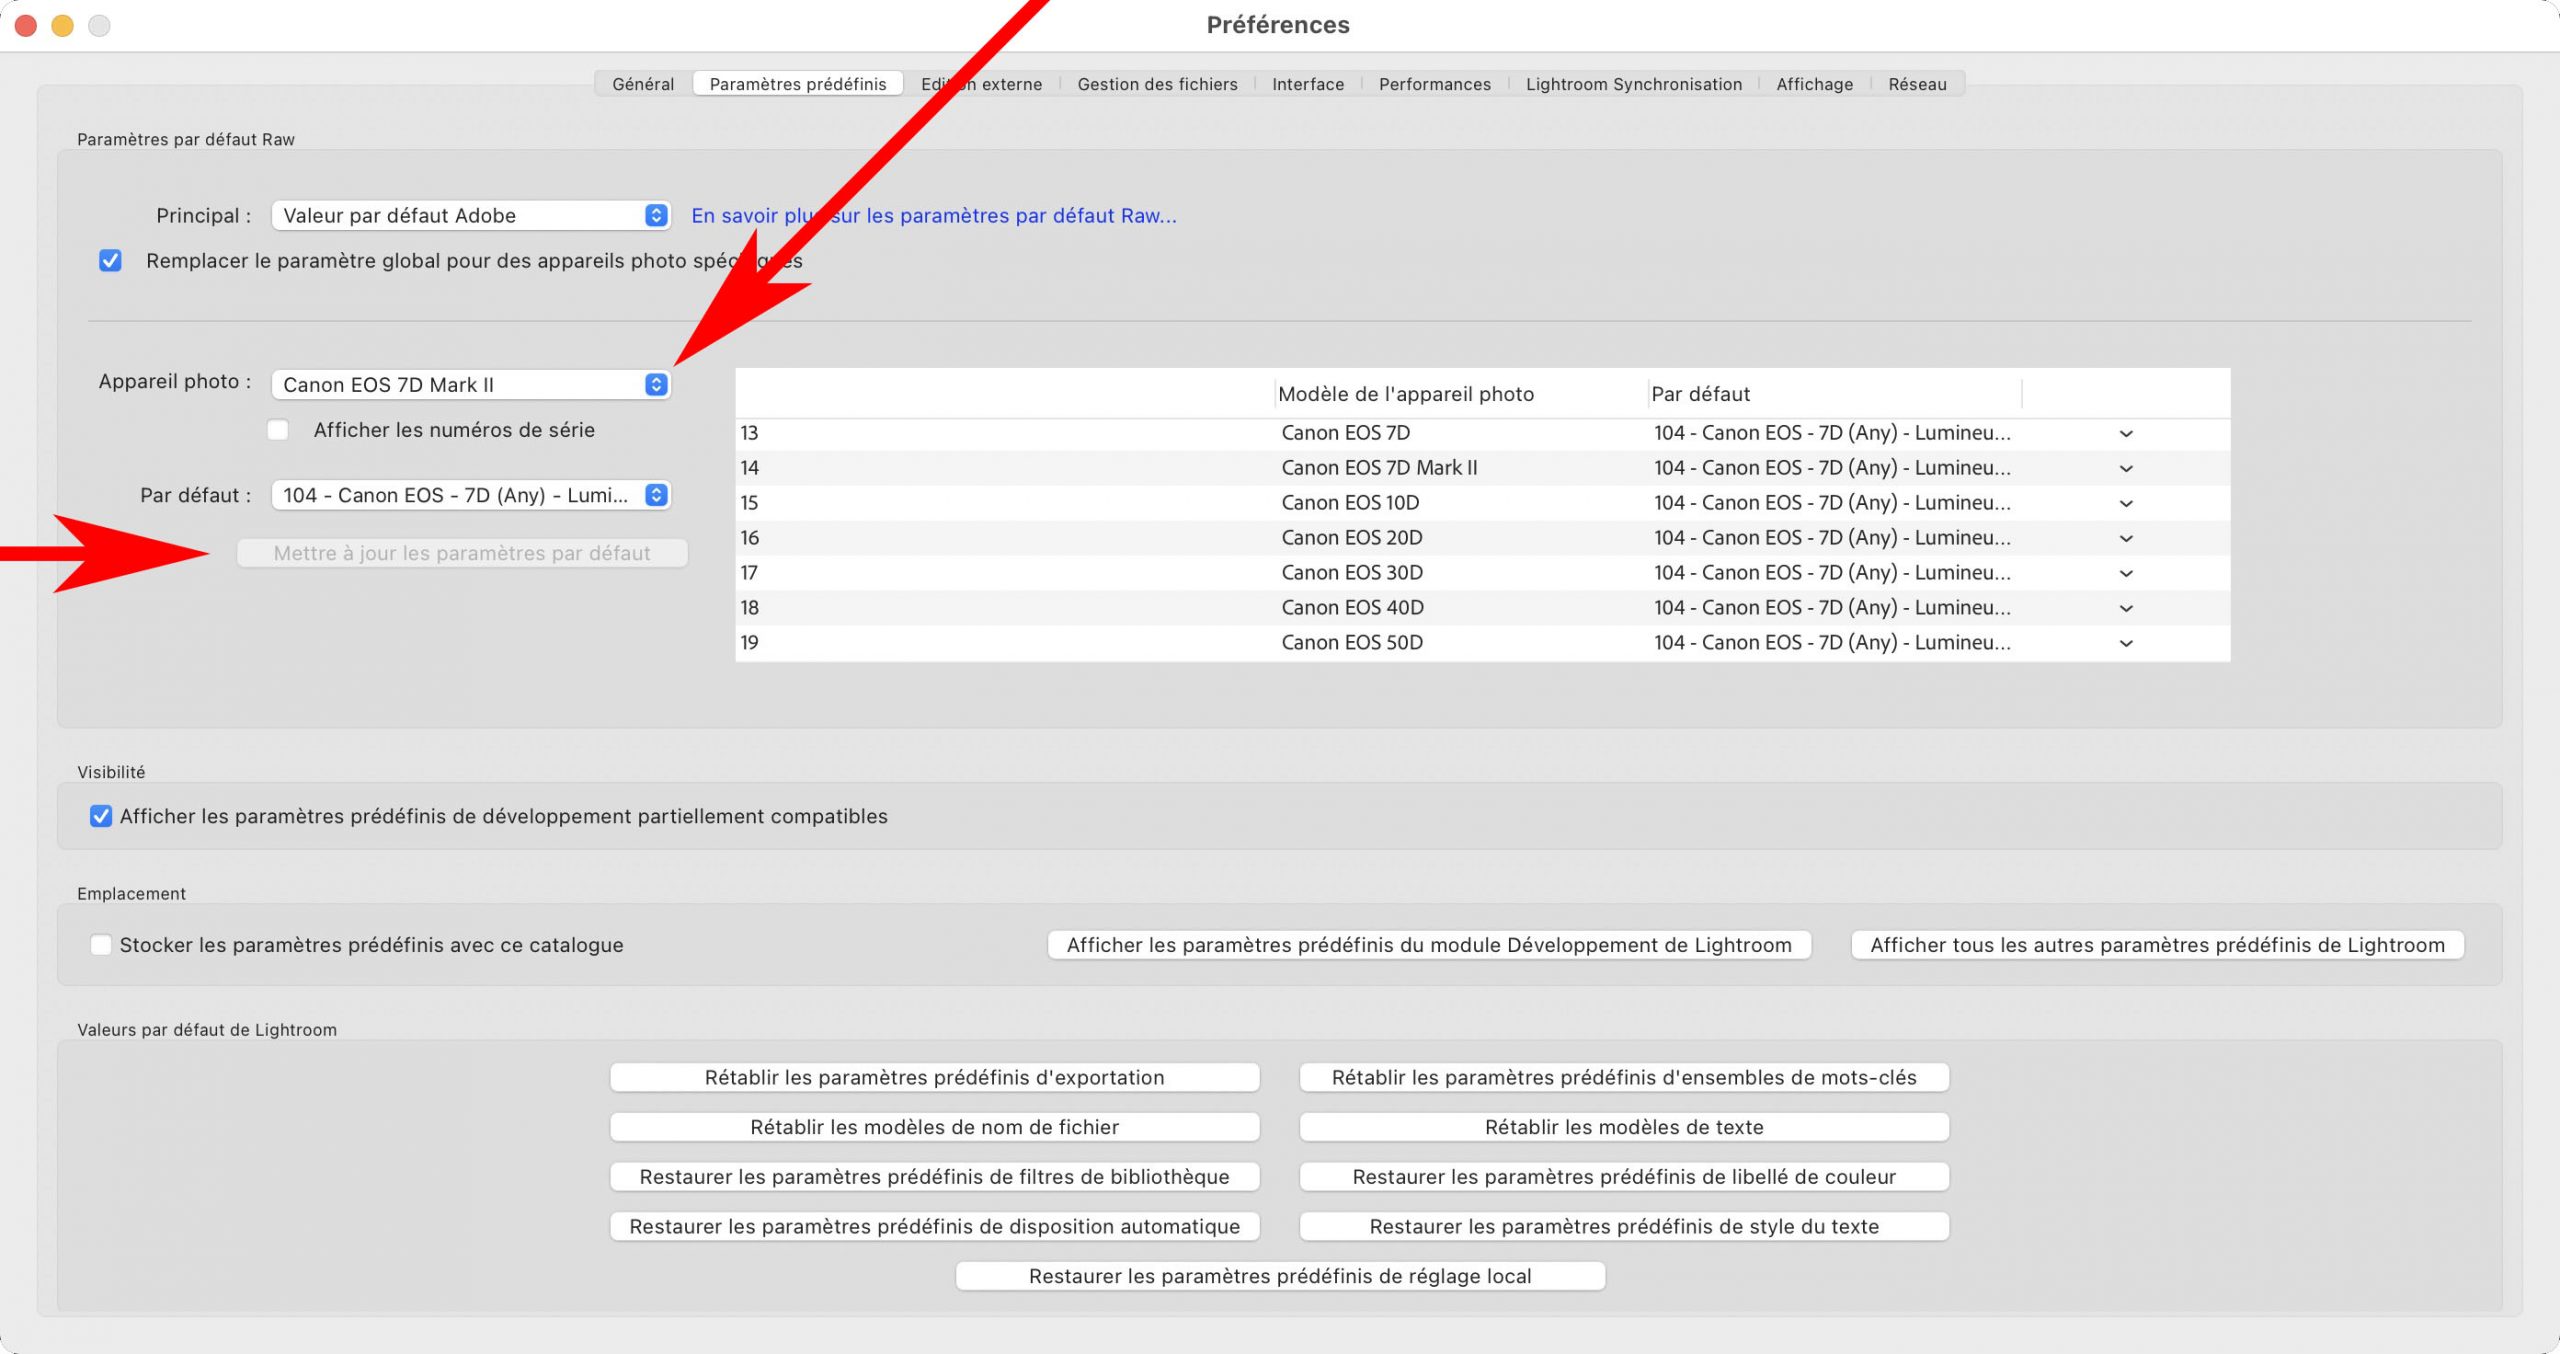
– Note: devices that you forget to add to the list will benefit from the “General rule” specified in step C.
– Later it will be possible to modify the personalization of each device. In the list of devices, click the triangle to the right.
– This “device by device” customization is optional, but useful if you have accumulated RAWs from several brands.
– Check “Show predefined partially compatible development parameters”. This is needed to modify the “Default Development Parameters” of some Camera.
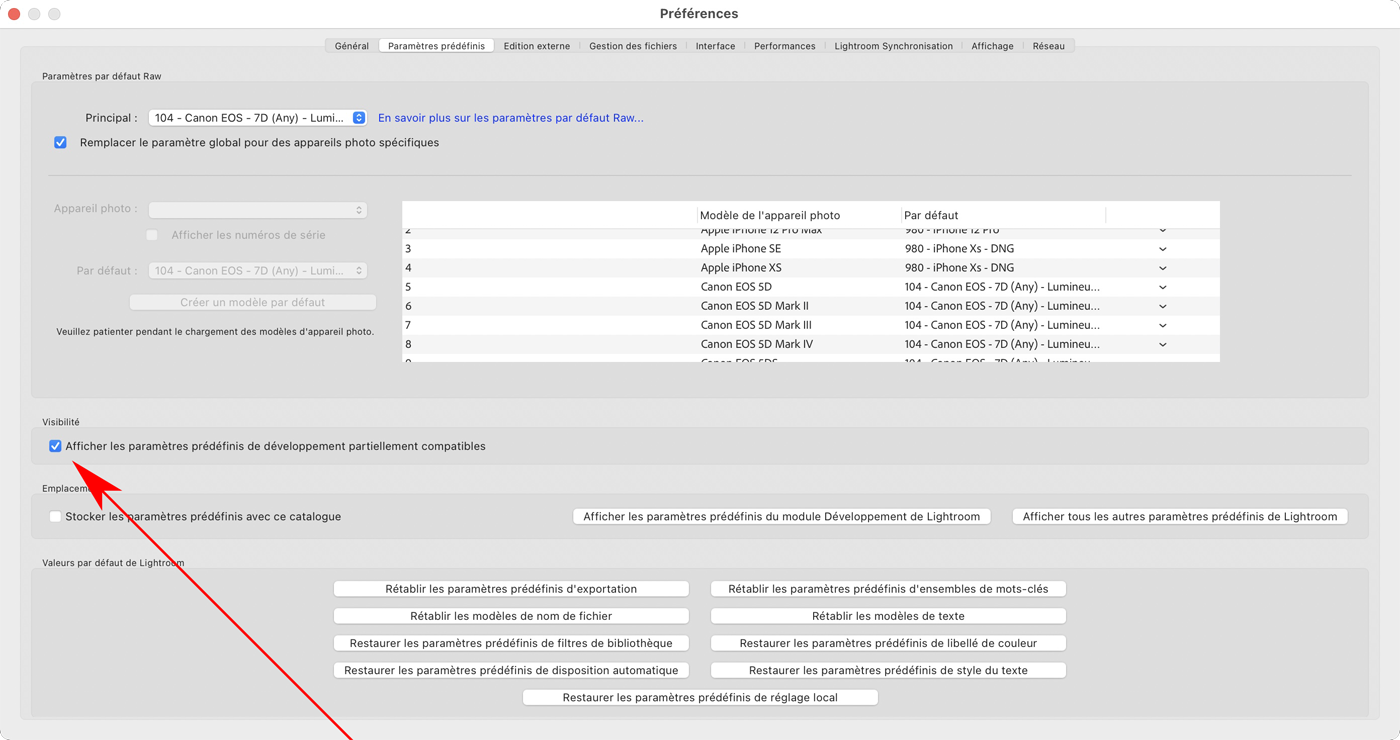
– If you don’t understand, read Adobe’s User Guide: : Lightroom Classic: Set defaults for raw file import.
3 / APPLY AN ADAPTIVE ISO PRESET … “FROM ABOVE”
From now on, the Default Develop Preset (defined in steps 1 to 2) automatically applies to any imported (or reset) image: you can increase the automation, by adding “in addition” the ADAPTIVE ISO Preset of your choice. This can be done as soon as you import (I recommend it), but also later … For example on your archives. Follow the guide, it’s super easy!
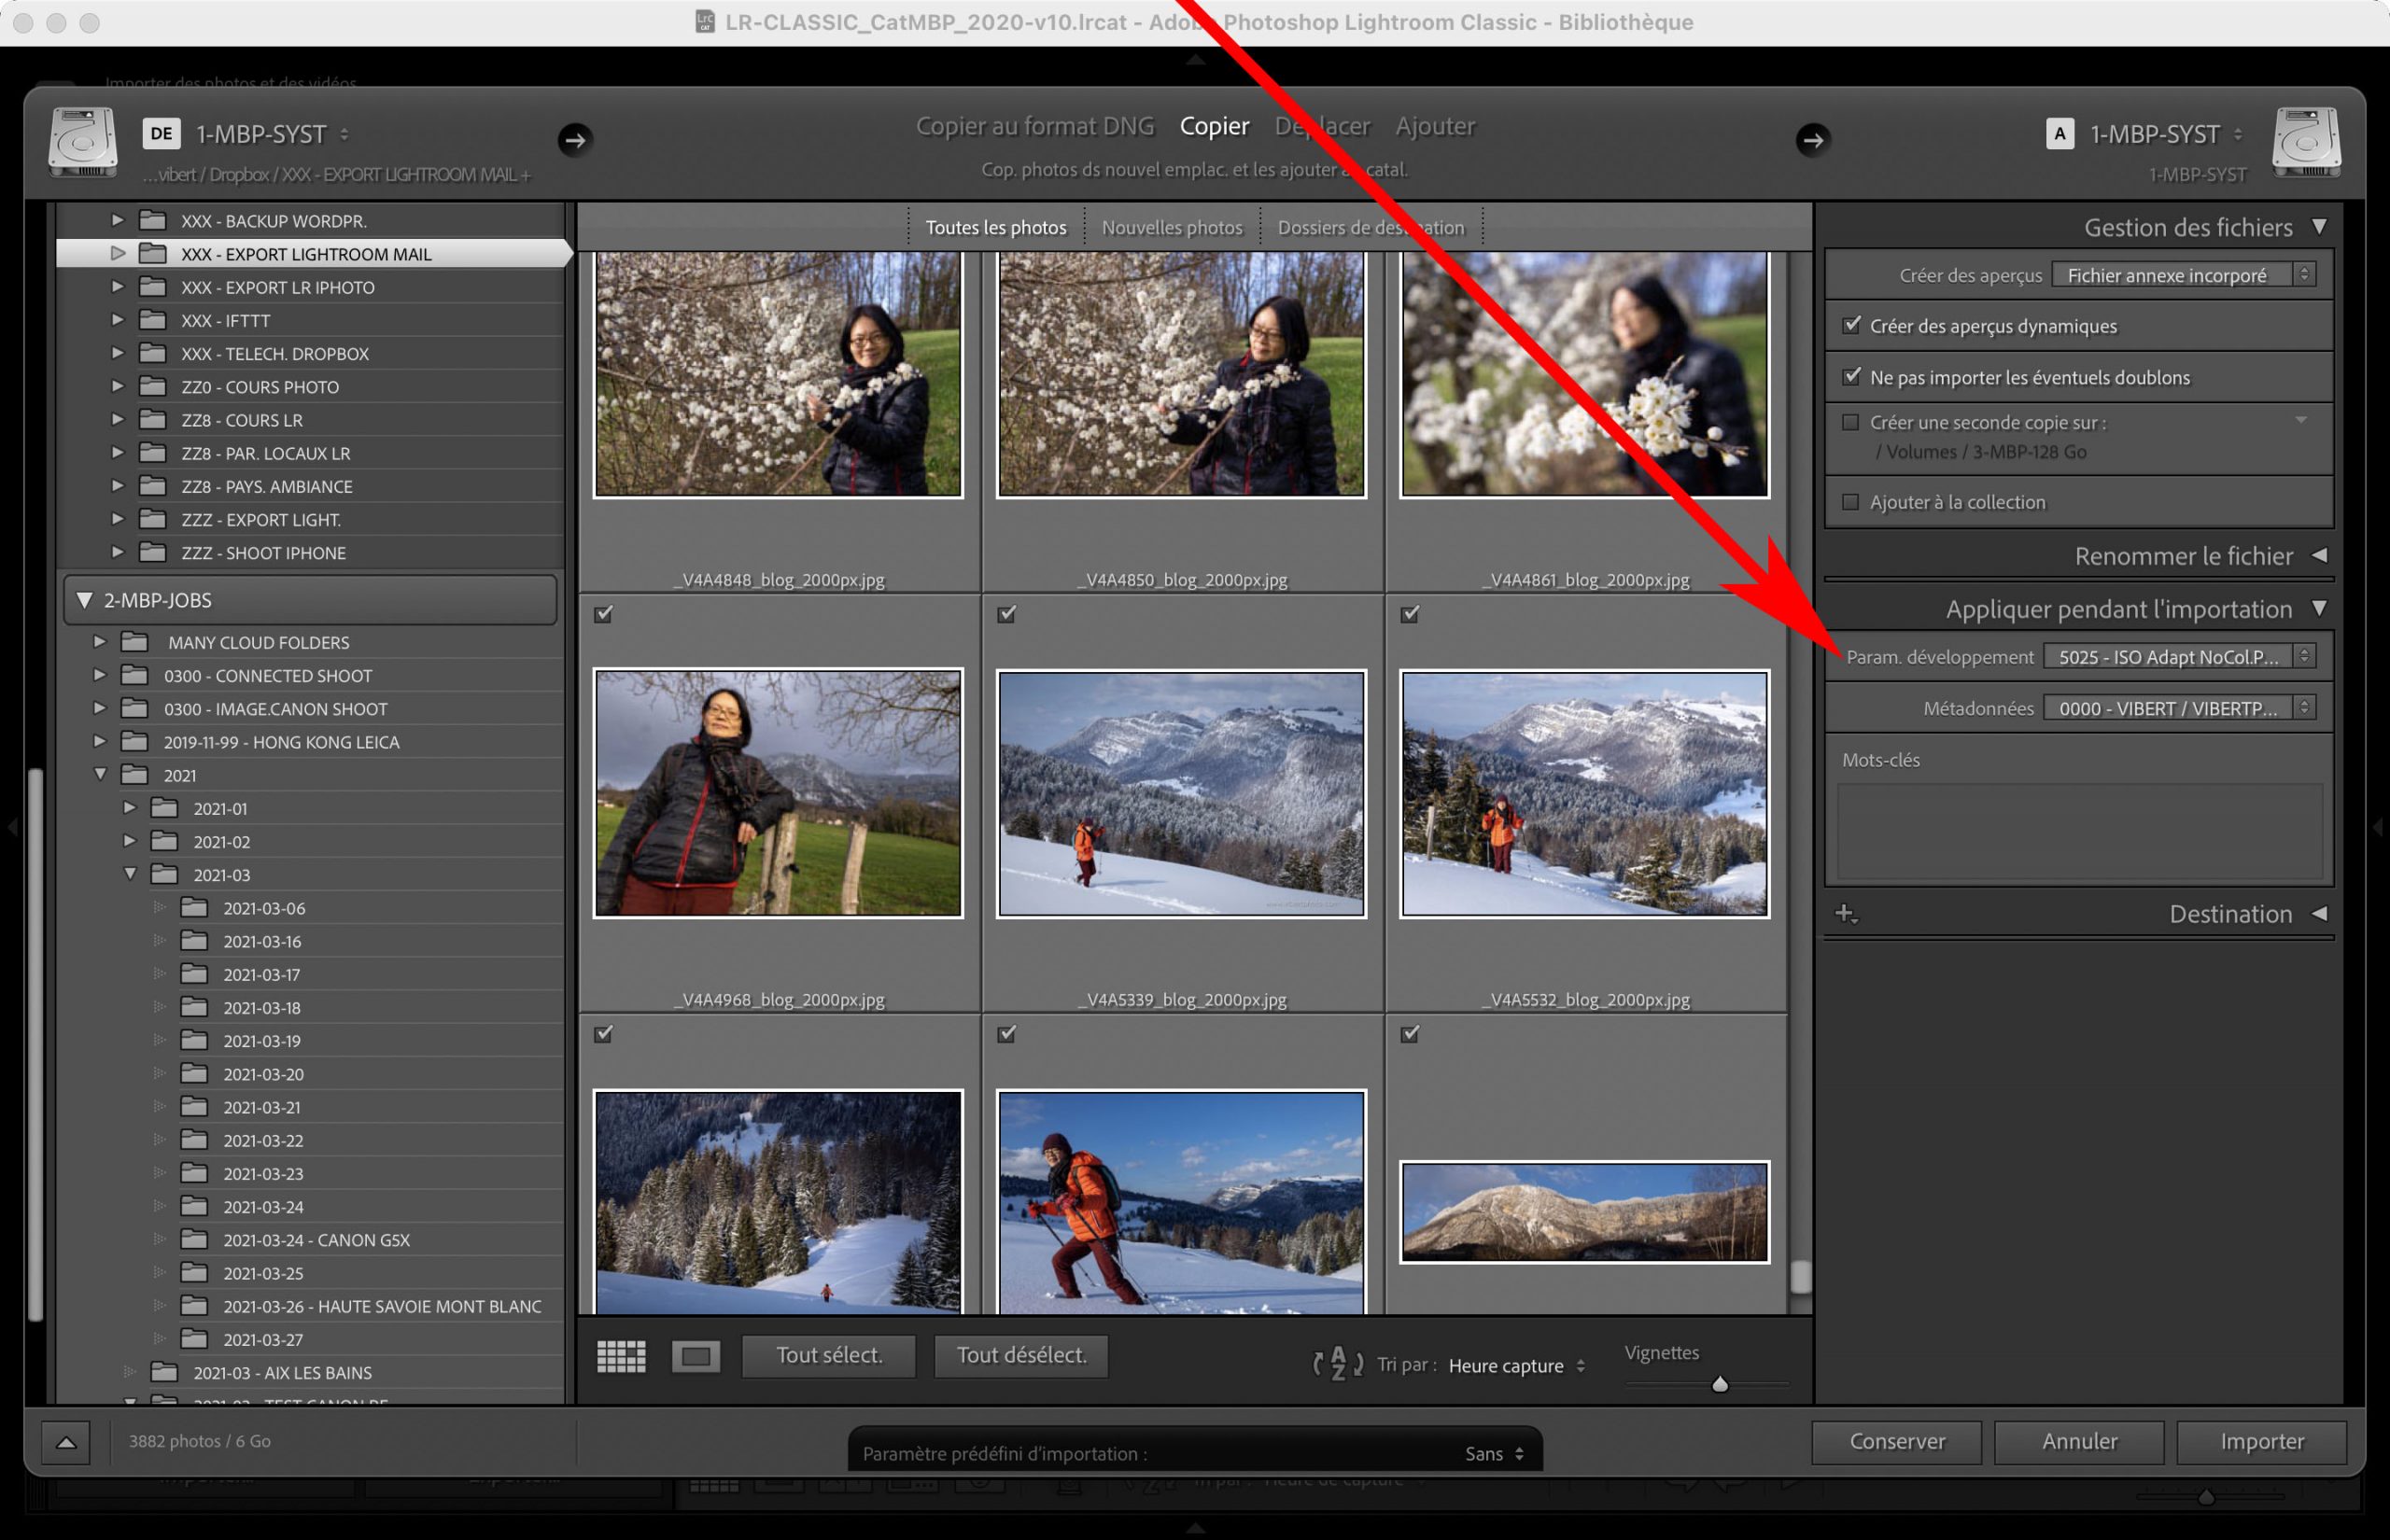
E – Apply an Adaptive ISO Preset “without profile” when importing RAW and JPEG
– In the import dialog select an Adaptive ISO Preset in the “Apply during import” tab: red arrow.
– The Adaptive ISO Preset works on RAW but also on JPEG which is practical … (if the ISO value is present in the EXIF data).
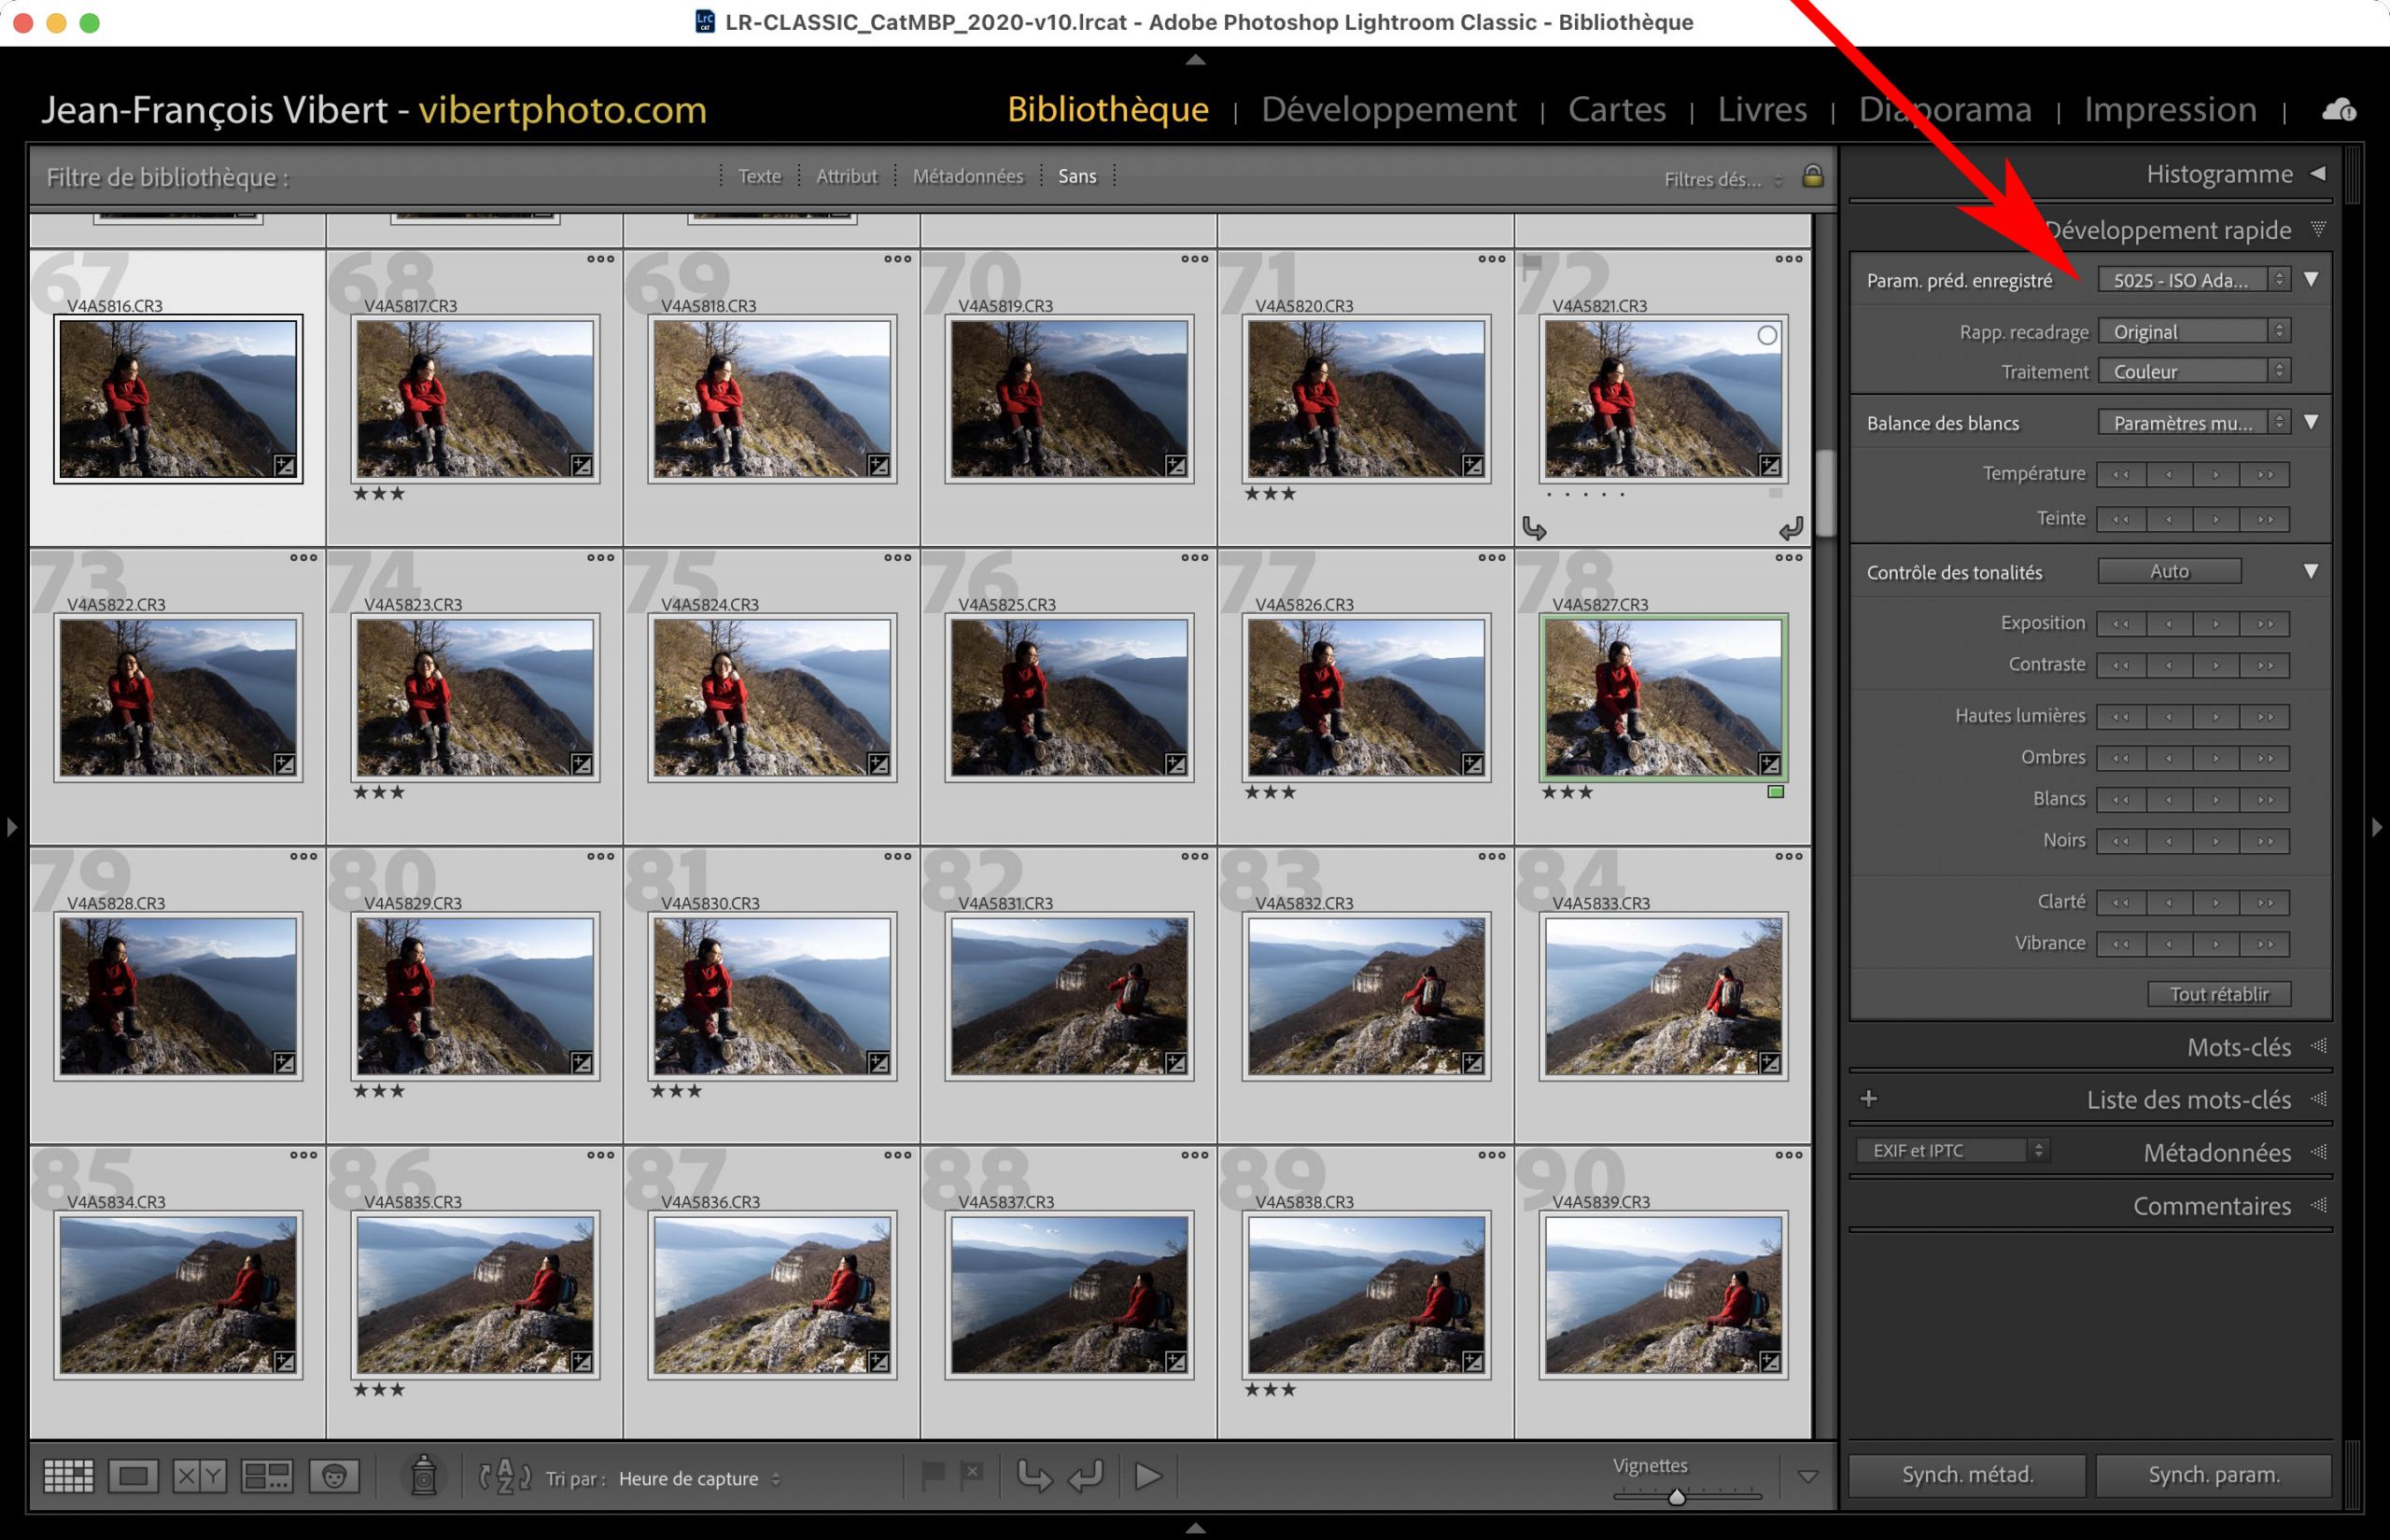
F – Apply an Adaptive ISO Preset “without profile” on existing folders
– Select images from the Library grid: RAW and even JPEG if you want.
– Select an Adaptive ISO Preset from the “Quick Development” Menu in the right panel of the Library
G – This Preset is applied “above” the “Default Develop Preset”
– If you apply an Adaptive ISO Preset “without profile”: your RAW image keeps the existing Profile (defined by the Default Develop Preset).
– If you apply an Adaptive ISO Preset “with profile” (Standard Camera or Adobe Color): then the image profile is replaced.
– The Adaptive ISO Preset “without profile” modifying only the sliders of “Details” (sharpness and Noise): the other characteristics of RAW remain intact.
4 / CONCLUSIONS
Thus, it is possible to automatically combine the use of the “Color profile” of your choice and the “ADPATATIVE ISO Preset” of your choice. This upon import, or later.
Ultimate precision: it is advisable to prefer the Adaptive ISO Presets “without profile” to carry out this procedure (which is good because they are the most sold) … Below, I recall why I created three kinds of Adaptive ISO Presets , in order to meet several needs:
And I remain at your disposal in comments, to answer questions…
|
|
| PROFILES FOR : CANON ⎪ NIKON ⎪ SONY ⎪ FUJIFILM ⎪ LEICA ⎪ PANASONIC ⎪ APPLE ⎪ DJI ⎪ OM SYSTEM ⎪RICOH ⎪ NEGATIVE FILM ⎪ ISO ADAPTATIF PRESET ⎪ Ai PRESET |